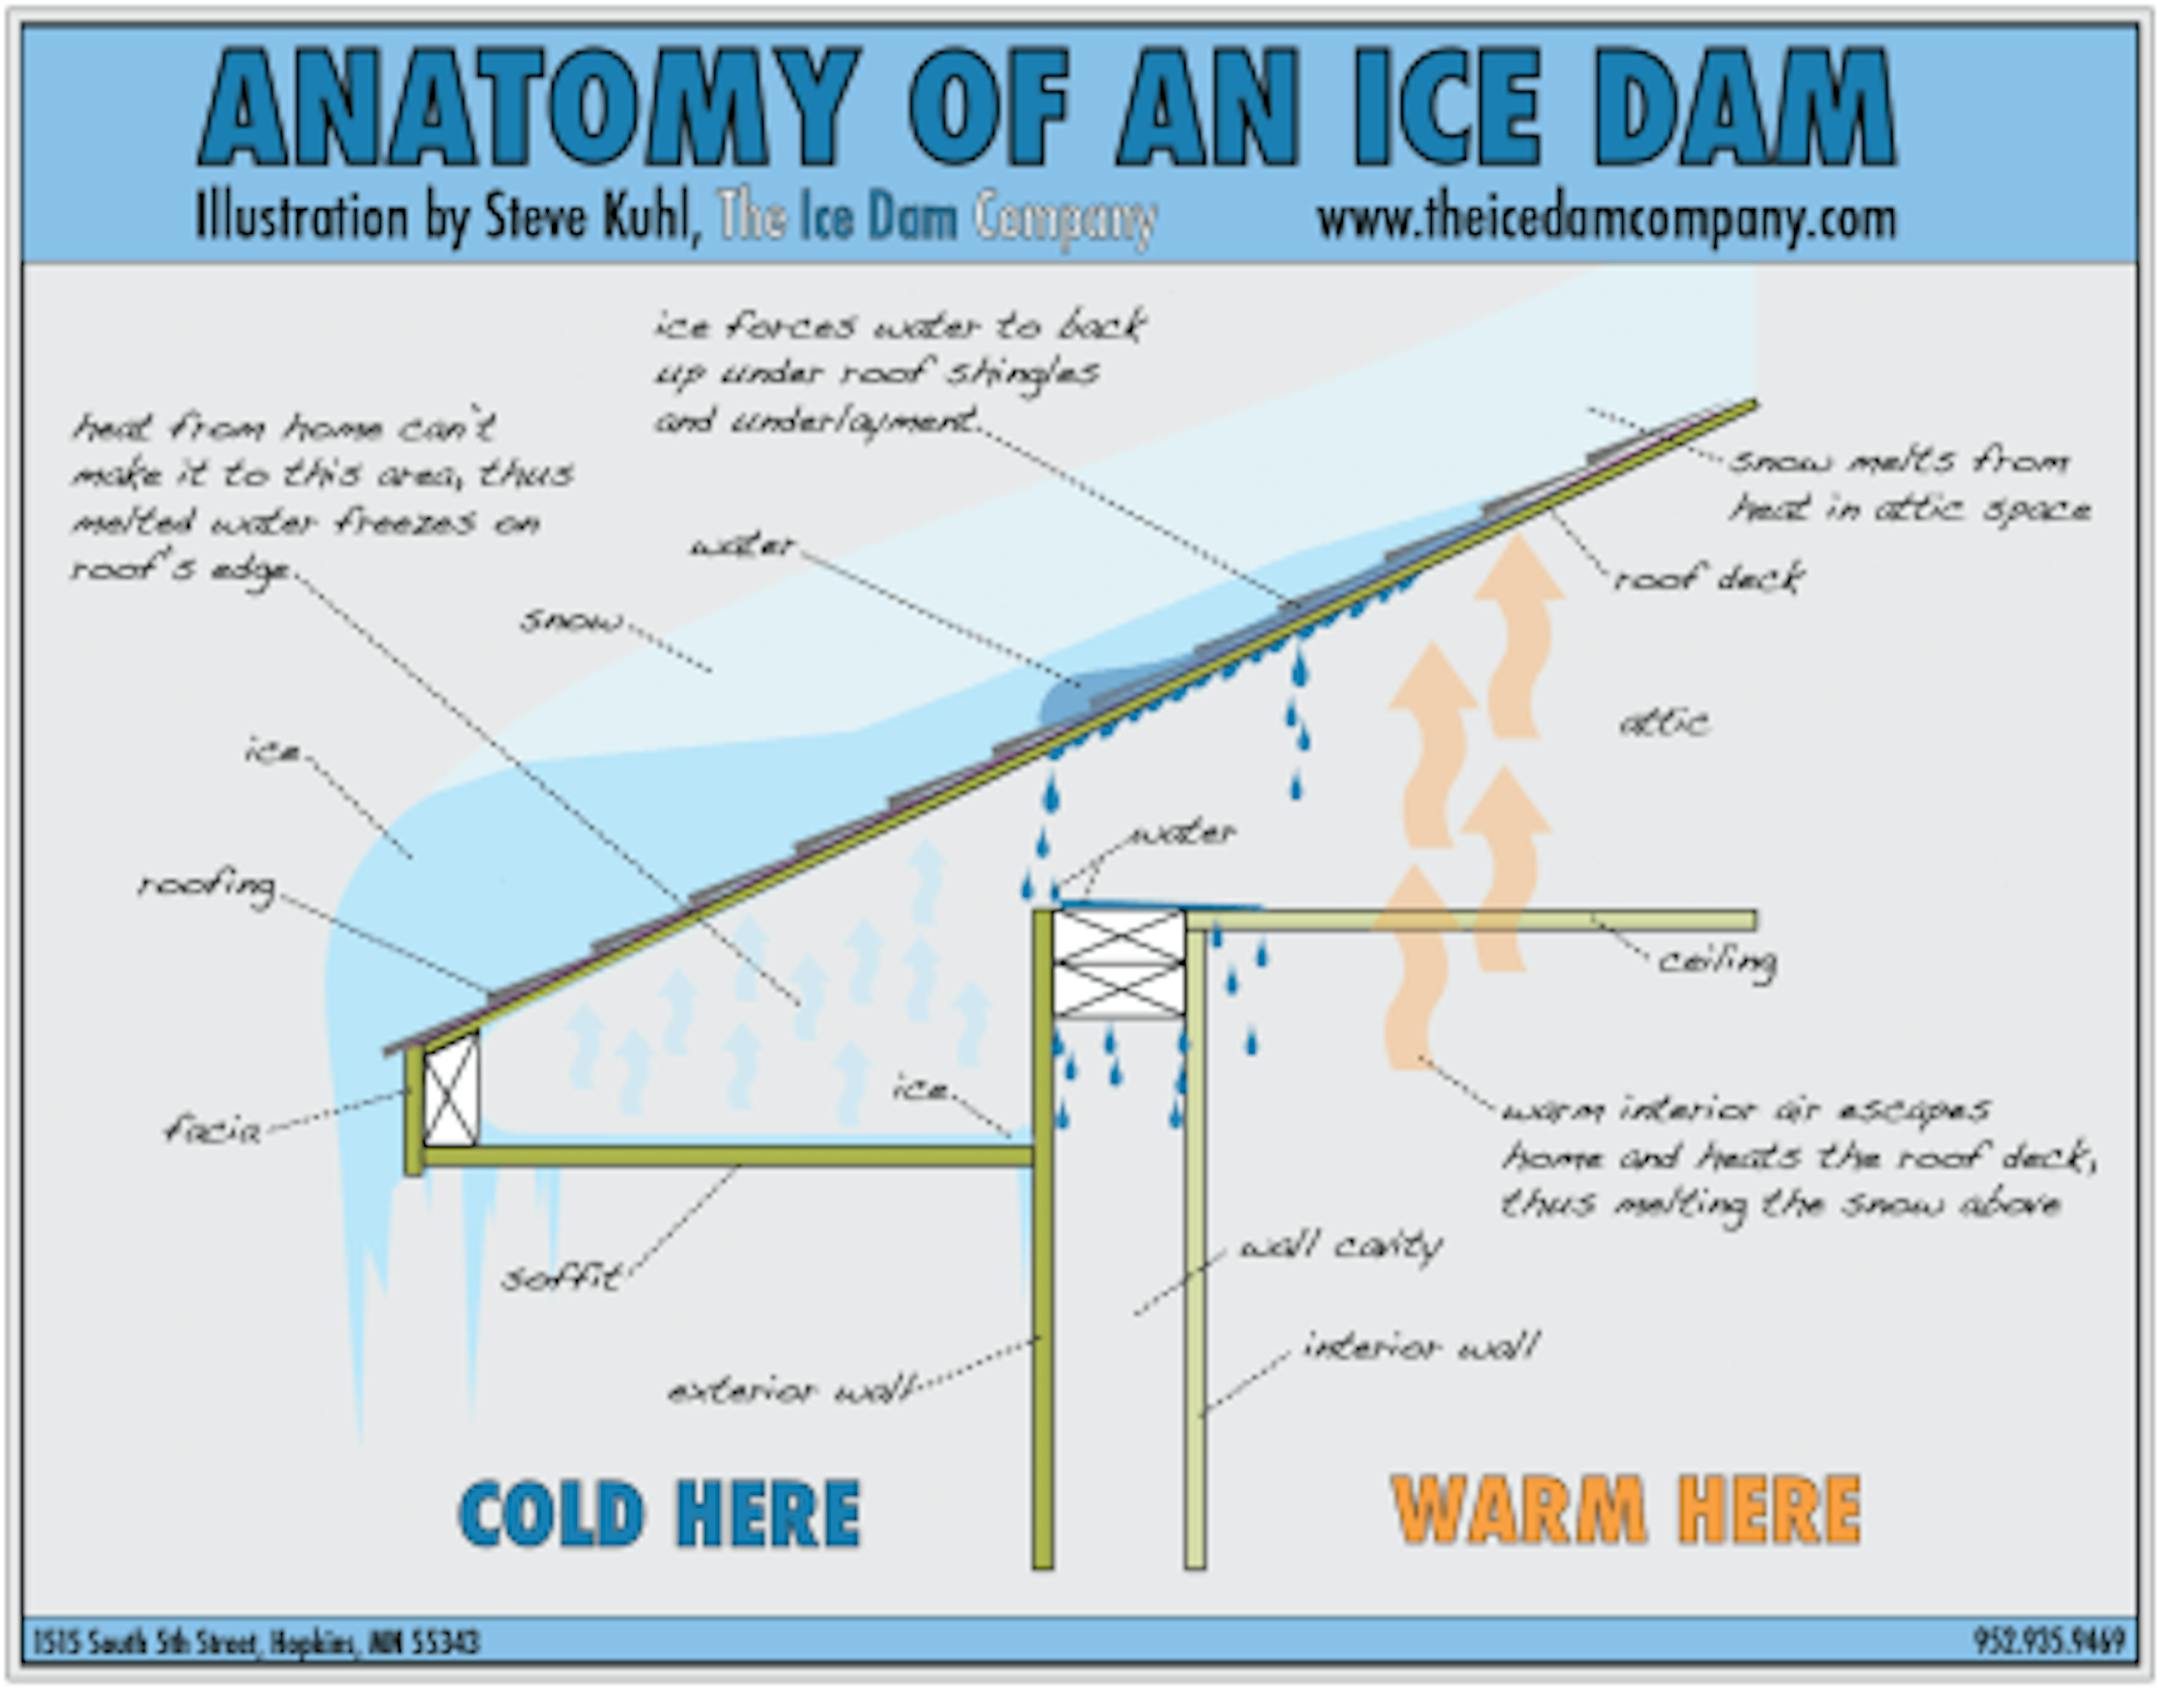
Ice dams are literally dams of ice that form on roofs and cause water to back up. Ice dams form when the snow that touches the roof melts, and then that water freezes again before running off the roof. This usually happens at the edges of roofs, but not always. If you'd prefer to watch a video that explains everything in this marathon blog post, I've created a marathon video that covers all of this. This video is a heavily-edited, stripped-down version of my one-hour class on ice dams.

Here's a diagram showing the basics of how ice dams form, courtesy of The Ice Dam Company.

The best way to prevent ice dams from forming is to address the three factors in your attic that contribute to ice dams; attic bypasses, insulation, and ventilation.

Attic Air Leaks (aka attic bypasses)

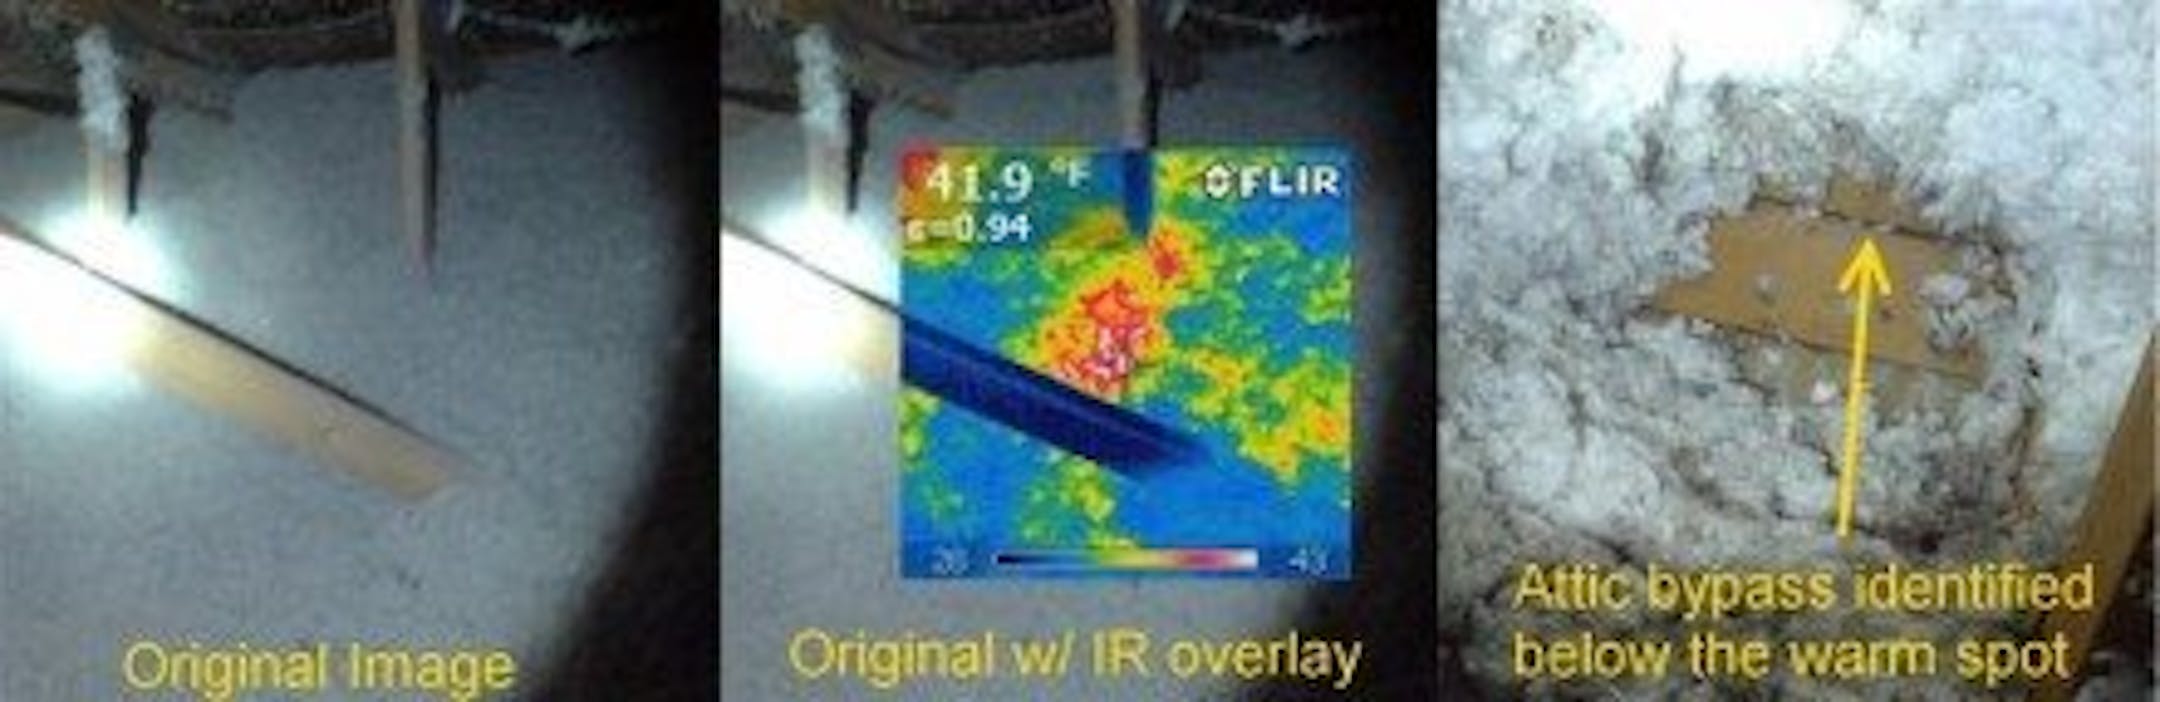
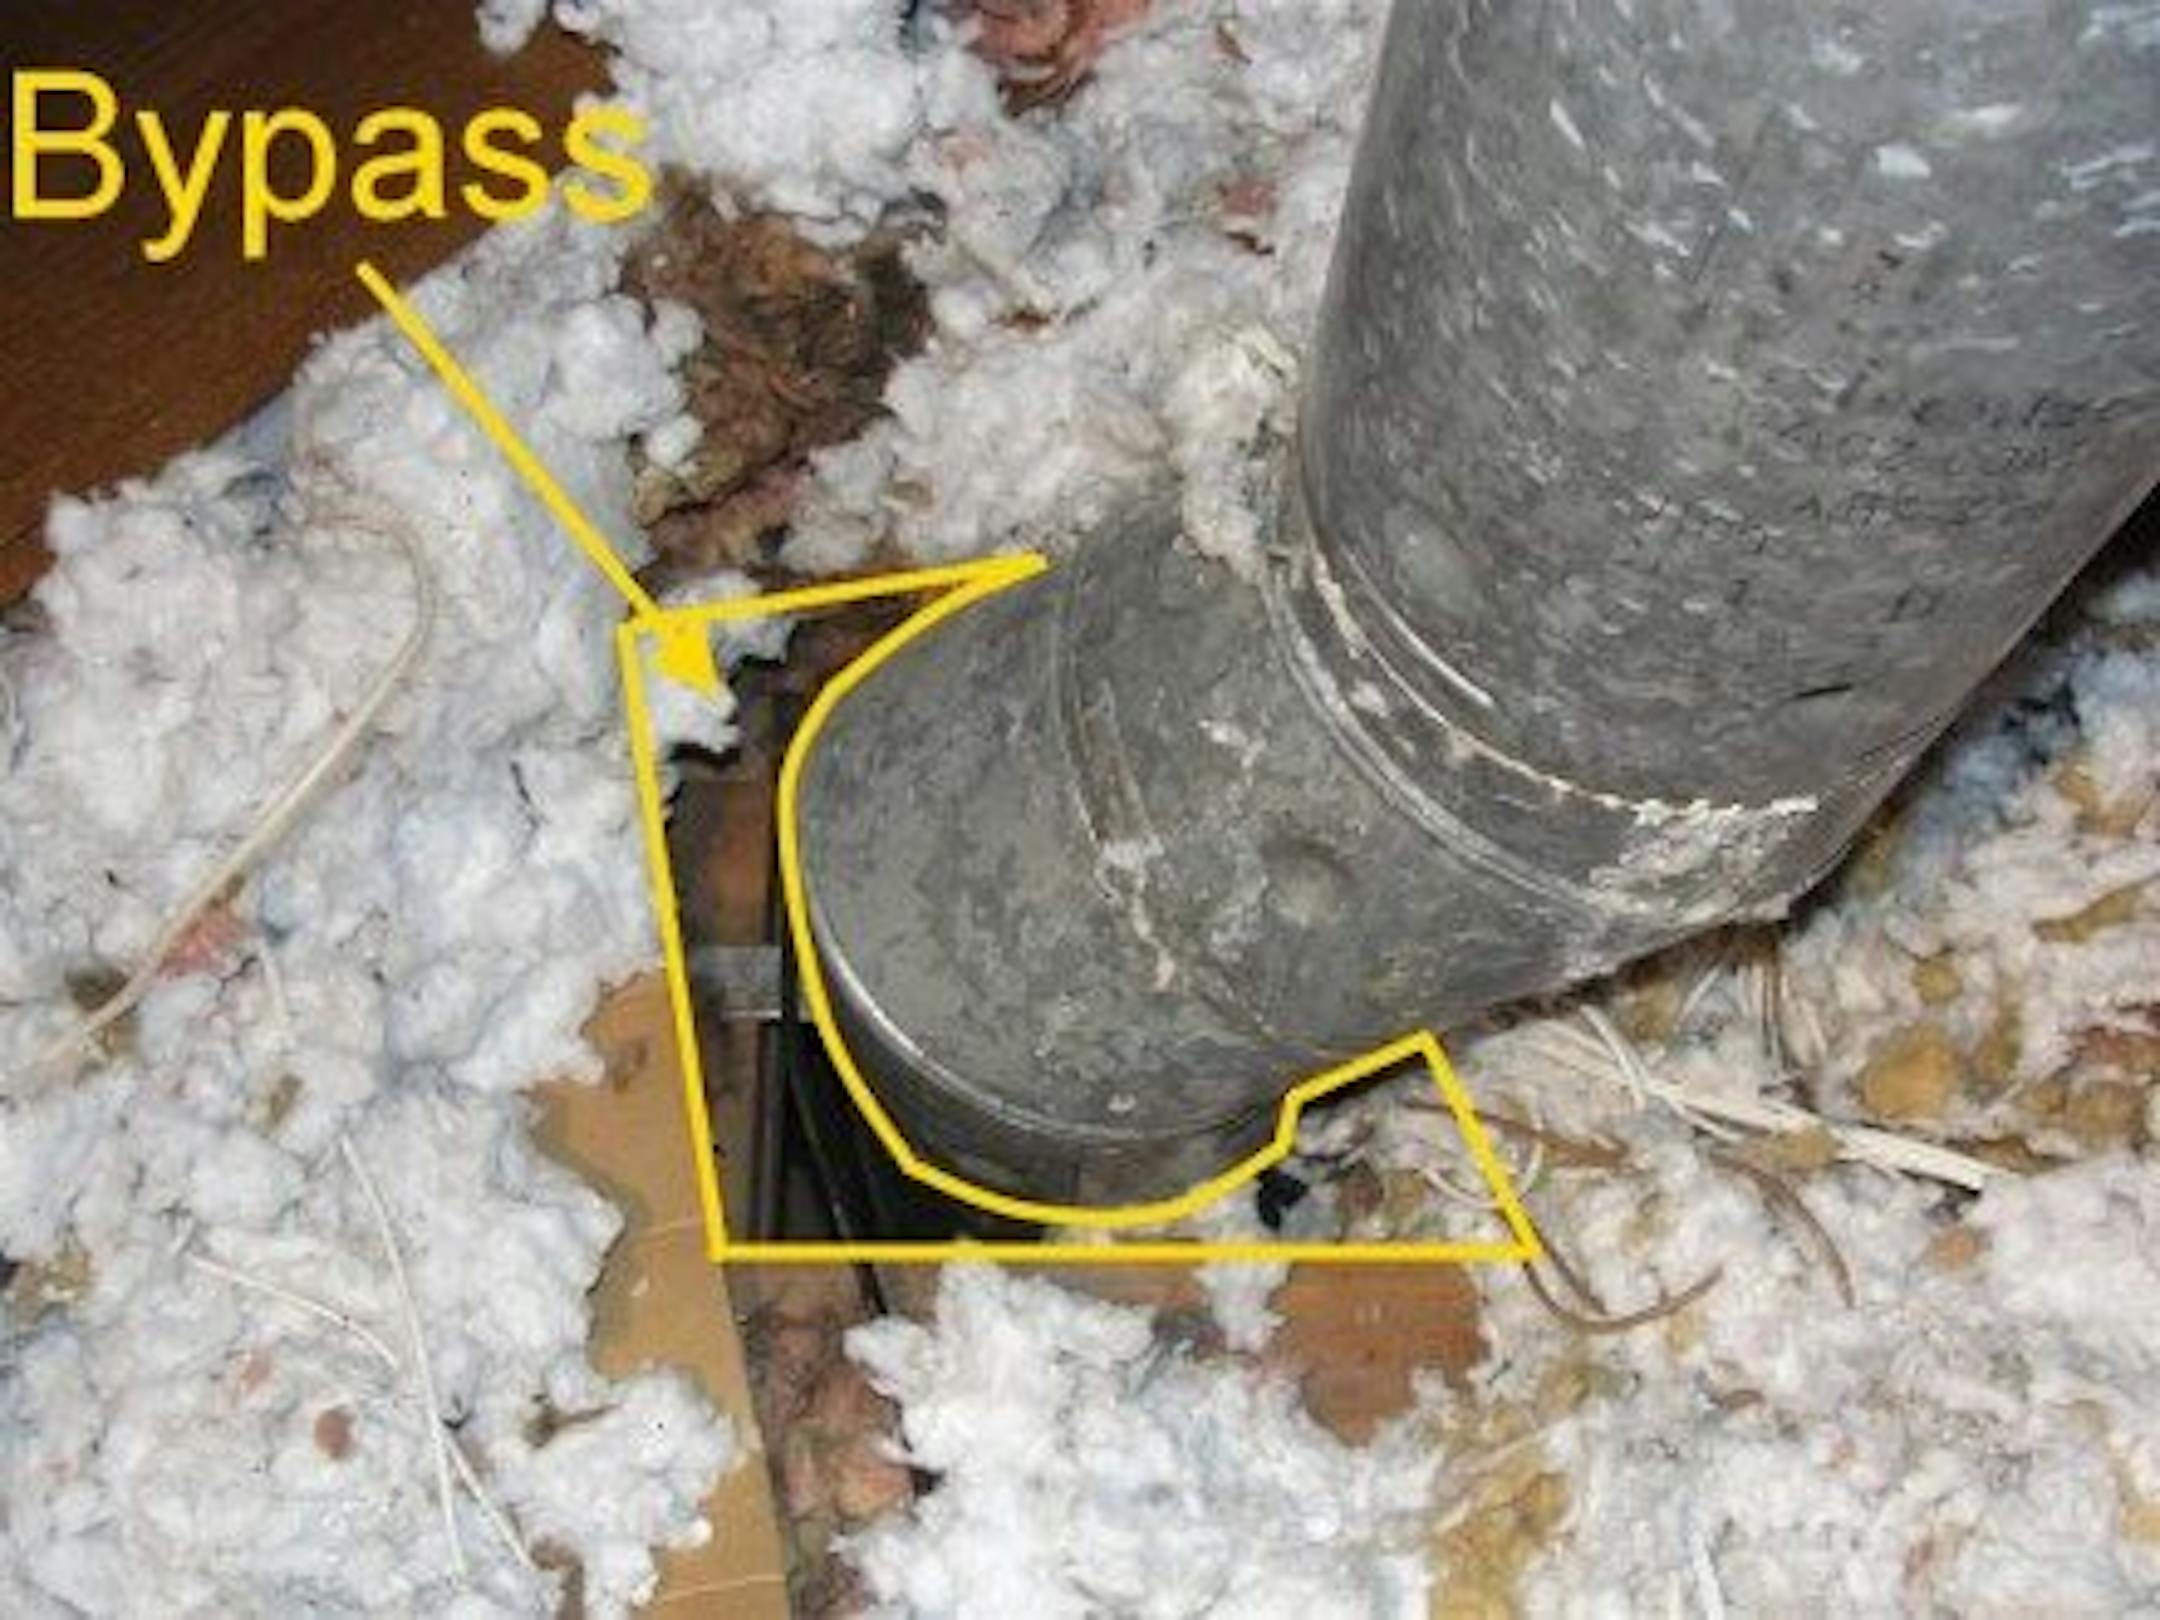
Attic air leaks cause ice dams. In almost every house with ice dams, there will be attic air leaks directly below the beginnings of the ice dam. Attic bypasses are passageways for warmed air to enter the attic space, and traditional insulation won't fix this. The photos below show some common attic bypasses that can be found in just about any older house. The image series below shows how an infrared camera can be used by a home inspector or energy auditor to locate these bypasses.

The photo below shows one of the largest and most common bypasses, which is the space around the furnace and/or water heater vent. Sometimes these are huge. The one shown below is relatively small, but allows a lot of air to leak up into the attic.

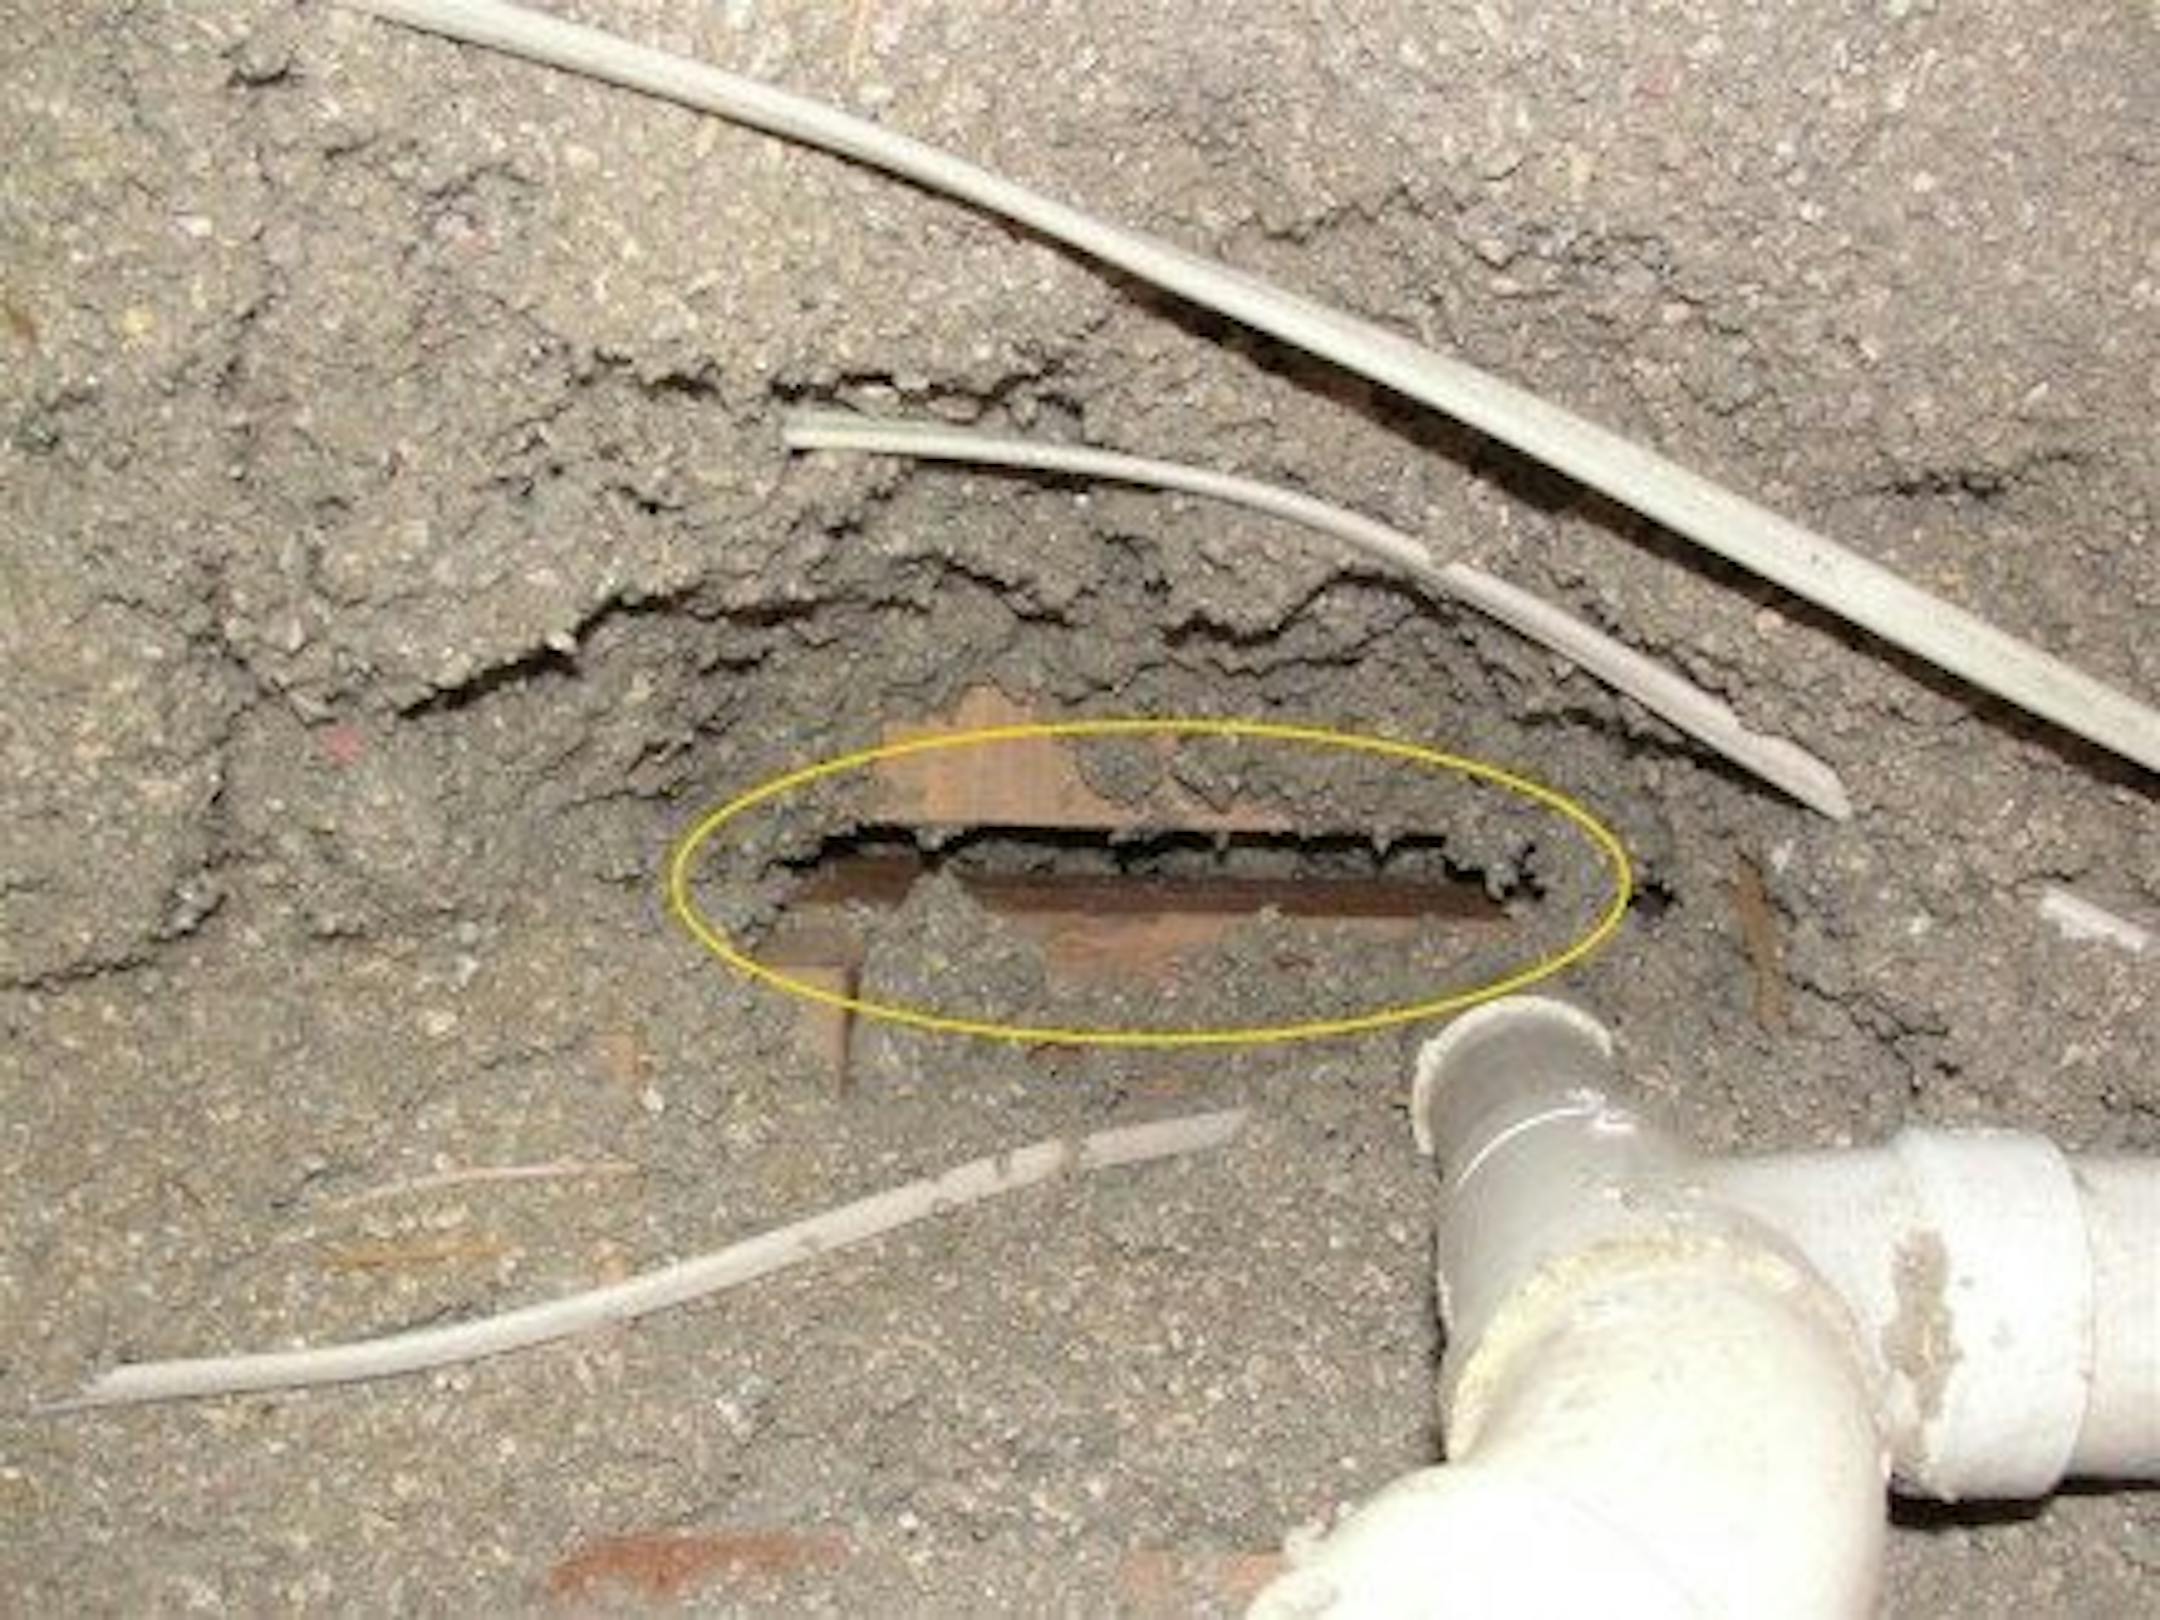
In the photo below, you can see several holes in the top plate of a wall that were drilled for wires to pass through. These holes could all be easily filled with spray foam, but finding these holes all over the attic would be a challenge without first removing the insulation, or performing an infrared inspection with a thermal imaging camera. The insulation had to be pushed aside to find these and take this photo.

With additions, the transitions between the 'new' and 'old' construction seem to always be sources of attic bypasses. The gap below was easily identified with the use of an infrared camera, but a lot of insulation had to be moved to get to the bottom of it.

When plumbing vents enter the attic, the space around the vents needs to be sealed. This one obviously wasn't.

Some older houses have whole-house fans that are designed to run on hot summer nights; these fans are gigantic sources of heat loss because they're usually not insulated or sealed up. The photo below was taken from inside the attic without a flash. There's some crazy heat loss occurring there, and as you might imagine, there was a huge ice dam nearby. No infrared camera needed to find this.

Old ramblers often have stairwells with nothing covering the top; you could fit an entire family into this space. It looked fine in the attic until I pulled the insulation away to show that this area was completely open.

The space around masonry chimneys is also a notorious location for attic air leakage.

What makes many of these attic bypasses so difficult to locate is that they're almost always buried in insulation. Finding these buried air leaks can turn into a guessing game for someone without a lot of experience digging through attics.

If you have these types of bypasses in your attic, my recommendation is to hire an insulation contractor to seal the air leaks. They'll know where to look and how to seal them properly. If you want to do the work yourself, download this guide from the Minnesota Department of Commerce, Attic Bypasses, and this guide from Building Science.com, Attic Air Sealing Guide and Details. These guides both give some excellent information on how to properly seal all of these air leaks yourself, and they discuss other concerns that need to be considered when performing attic air sealing, such as combustion appliance safety, knob & tube wiring, and vermiculite insulation.

If you plan to have more insulation added to your attic, have the air leaks sealed first. I can't stress this enough. Air leaks are the driving force behind ice dams, and sealing them is far more important than having insulation added. If your home was built before about 1990, it's almost a guarantee that you'll have attic bypasses that need to be sealed all over the attic.

Insulation

This is a basic concept that everyone understands; you need insulation in your attic. If there are voids in the insulation, they need to be fixed. If there isn't enough insulation, add more. The current minimum requirement for new homes in Minnesota is R-49 in the attic. This equates to about 18" of loose fill fiberglass, depending on the manufacturer. For more information about insulation methods, see my two blog posts from last year, Attic Insulation Types and Attic Insulation Methods.

Ventilation

Having adequate ventilation for the attic space will help to keep the roof surface cold, which will help to prevent snow from melting, which will help to prevent ice dams. Ventilation is required for attics, but it's the last thing that should be considered when troubleshooting the causes of ice dams.

If the soffit vents are dirty, clean them or replace the grills if they're painted shut. Grills are cheap. If soffit vents are blocked with insulation, install air chutes at the eaves to prevent the insulation from blocking the vents.

A Few More Tips

Here are a few more tips on preventing ice dams. These deal more with the design of a house than anything else.

Valleys Can't Be Vented

Ventilation plays a small role when it comes to preventing ice dams because vents can help to lower the roof temperature. The problem with roof valleys is that they can't be vented. If I were to design my own house, it would certainly be a big boring box with a plain hip roof; no valleys, no gables, no personality. Like the diagram below.

Valleys Should Never Meet

Valleys can't be vented, they have a lower slope than pitched roofs, and ice from two roof surfaces gets concentrated. Ice dams are always the worst at valleys. What happens when two valleys meet each other? The potential for ice dams goes way up. From a performance standpoint, this is a horrible design.

Oh, and don't get me started on what this means for water management during the summer… never mind, I already blogged about that: Have Your Builder Plan for Water Management.

Don't vent fans through the roof

What happens when bath fans, kitchen fans, and clothes dryers terminate at the roof? Snow melts when the fans run, of course. This leads to water running down underneath the snow, then freezing again at the eave, or in some cases, right in the middle of the roof.

This can be a major contributor to ice dams, or in the case of the photo above, can be the sole cause of ice dams. The way to avoid this is to have bath fans and kitchen fans terminate at walls, not roofs. This also applies to clothes dryers; while it has become standard practice to put laundry rooms on the second floor in new construction homes and terminate the vent at the roof, this is unquestionably a terrible place to terminate the dryer duct. It will melt a lot of snow, and there is usually no easy way to clean off the terminal. See Don't vent your clothes dryer through the roof for more on this topic.

Oh, and whatever you do, don't place vent terminals for bath fans, kitchen fans, or clothes dryers in a place where the melted snow will pile up in a valley. That's almost a sure way to create ice dams, even if everything else is done properly.

How To Prevent Ice Dams from the Exterior

If you live in a 1-1/2 story home in Minnesota, you probably get ice dams. There's not much that can be done to prevent ice dams the right way at this style of house, short of gutting the upper level and framing down, or tearing the roof off and framing up. Homes with vaulted ceilings and other inaccessible attic spaces can also be a real challenge. In these cases, ice dams may need to be controlled from the exterior.

Remove The Snow

Pulling snow off the roof with a roof rake will keep ice dams to a minimum. This becomes a constant chore, but it's better than dealing with water leaking into the house. Just raking the first several feet of snow from the eaves is typically enough to prevent the formation of ice dams, but in some cases, this will cause ice dams to form higher up on the roof. The trick is to get the shingles exposed to the sun; once that happens, the sun will warm the shingles enough to prevent ice from accumulating.

Raking snow off the roof with a roof rake is a safe way of removing snow, as long as you don't get too close to your overhead power lines. In theory, a roof rake could cause some premature wearing of shingles by removing the aggregate, but it's not a big concern of mine. Some roof rakes have little wheels at the bottom that prevent the rake head from actually rubbing on the shingles. If you're worried about damaging your shingles, get one of these.

While the roof rake pictured above is the most common type, there are many other variations of this designed to make the work easier; one such version is the MinnSnowta Roof Razor®.

Removing snow from the eaves is an effective way to prevent ice dams, but it won't work 100% of the time. I have personally inspected several houses with ice dams forming right where the snow stopped being removed. This is not typical, but it can happen during especially cold, snowy winters, like the ones we had about a decade ago. And perhaps this winter. When this happens, people start to get depressed and wonder why they live in Minnesota.

The fix for this is to have all of the snow removed.

For two-story homes where using a roof rake from the ground isn't practical or possible, the options are to risk your life getting up on an icy roof to shovel the snow off, hire someone else to risk their life, or install roof de-icing cables as a preventative measure.

De-Icing Cables

Roof de-icing cables, also known as heat cables or heat tape, should be considered a last resort when it comes to preventing roof leaks from ice dams. De-icing cables themselves aren't cheap, it costs money to have them professionally installed, and they'll cost money to operate; between five and eight watts per foot. I've also heard that they can damage shingles, but I've never seen any evidence of this.

On the flip side, de-icing cables are very effective. When de-icing cables are properly installed and operational, ice dams won't cause leakage. De-icing cables won't prevent the formation of ice at the eaves, but they'll keep enough ice melted to create drainage channels for water.

If you choose to install roof de-icing cables yourself, here are a few tips:

  • Measure the areas where you need to install your de-icing cables first and buy appropriately sized cables. For a simple 15′ section of roof with no overhang, a gutter, and one downspout with an extension, you will need a 60′ heating cable.
  • The cables should extend 12″ up the roof past the exterior wall line, through the gutters and downspouts, and 2/3 of the way up the valleys.
  • Don't bother removing the snow from your roof; you could damage your cables, and you could potentially create another ice dam higher up on the roof, defeating the purpose of the heating cables.
  • Don't expect the snow and ice to melt the way it does in the promotional photo above. It's like comparing a photo of a fast-food burger to the burger that actually comes in the fast-food bag.

If fixing the causes of ice dams isn't a possibility and safe removal of snow isn't possible, de-icing cables or de-icing panels may be a good choice. Sometimes this is the most cost-effective way to prevent roof leakage from ice dams. The fine folks at The Ice Dam Company also sell them and install them; see https://www.icedamcompany.com/ice-dam-prevention/shop/ice-dam-prevention-products/

How To Remove Ice Dams

There are plenty of 'hack' methods of removing ice dams, so I tried a bunch of them at my old neighbor's house. Thanks again, Jonathan. I tried an axe, ice pick, pantyhose, salt, and heat cables… just for fun.

Let me repeat – these are all hack methods. I don't advise any of these methods, but when people have water leaking into their home, these DIY methods are what people turn to. Hopefully, I can talk people out of doing most of these. The most effective and safe way to remove an ice dam is to hire a professional ice dam removal company that will use steam. That's it, that's all. Hire a professional to remove your ice dams with steam.

Axe

The most obvious way to get rid of ice dams is to take a blunt instrument and hack away at the ice dams. I tried an axe.

Pros: Fast results. I hacked through several feet of six-inch thick ice dams in a matter of minutes.

Cons: Unsafe, cumbersome, and you'll wreck your roof. I had to set up a ladder on the icy ground and swing an axe while standing on a ladder. The ice also really flew in my face; I should have been wearing goggles. I was only able to remove the ice down to the gutter, and only able to get close to the surface of the roof without risking damage to the shingles. I've inspected dozens of roofs where someone got crazy with an axe at the eaves. It's a great way to ruin your roof.

Verdict: This is a high risk, yet fast and effective way of getting rid of a lot of ice, but leaves the job incomplete. You'll probably damage your roof doing this, and you might hurt yourself too.

Ice Pick

This sounds like a natural choice, doesn't it? I actually used my awl, but close enough. I gave it my all. <insert crickets chirping>

Pros: Very fast results, very little effort. It's as though this tool was made for picking at ice. Oh, wait… Still, I was genuinely surprised at how fast and accurate this method was.

Cons: Unsafe. Again, I was jabbing at ice dams while standing on a ladder, which was sitting on the icy ground. I also had to be very careful to not damage the roof.

Verdict: This worked quite well… but again, you'll probably poke a bunch of holes in your roof doing this.

Roof Tablets

Yes, this is a product designed specifically for preventing damage from ice dams. Contrary to the name on the container, the product doesn't actually melt your roof (whew). The instructions say to toss the tablets on to your roof and they'll melt through the ice dams, allowing for "water to drain safely".

I tried tossing the tablets on the roof like the instructions said to do, but it didn't work out very well. I consider my tablet tossing skills to be well above average, but I still couldn't get the tablets to end up in a good location; they all just slid together in one place. If I didn't get a ladder out to take pictures, I never would have known that the tablets didn't end up in a good spot.

Just to give the roof melt tablets the best possible chance for success, I hand-placed them on the ice dam and I used about four times as much as the directions called for. The instructions said to put them higher up on the roof, but I wanted to make some holes in this ice dam.

By day two, I had some pretty dramatic results; the tablets had melted all the way through the ice dam. By the way, for anyone in a southern climate that might be reading this blog, that white stuff on the ice is snow, from a very light snowfall the night before.

By the third day, not much change. There were definite holes in the ice dam, and some channels had formed for water to drain through, but the majority of the ice was still there.

Pros: If you had perfect aim and tablets didn't move after you tossed them on to the roof, this would be very safe. Some channels were created for water to drain through, which might be enough to prevent leakage at your roof.

Cons: The tablets don't stay where they land, which negates the whole safety thing. I still had to set up a ladder on the icy ground and move the tablets around myself. This method was also pretty ineffective; it created a bunch of holes in the ice dam, but so what? Most of the ice dam was still there in the end.

Verdict: This might be a nice way to get down to the roof surface, and it might prevent leakage from ice dams if enough channels are created for water to drain through, but you're still left with a huge ice dam.
Salt Filled Pantyhose

Take off your pantyhose, fill 'em up with salt, and toss 'em on your roof perpendicular to the ice dams. The idea is that the salt will leak through the pantyhose and create channels for the water to drain through, preventing water from leaking into your house.

I filled one pantyhose leg with "Ice Melt", which contained a blend of calcium chloride and rock salt. I filled another with an ice-melting salt that didn't have the contents labeled; I suspect it was just rock salt. I also poured the Ice Melt in a perpendicular line along the ice dam, using far less salt than I used in either of the pantyhose. I did this just to compare the results.

10:00 AM (Start Time)

2:00 PM

4:00 PM

The pantyhose were a bit of a bust for me. With salt alone being so effective, why bother with the pantyhose? I've heard several opinions on this:

  • The pantyhose will contain the salt and prevent runoff. The idea is apparently to leave the pantyhose there all winter.
  • The pantyhose can be 'flung' onto the roof with a rope; no need for a ladder. After the work is done, you pull the pantyhose back down.
  • The pantyhose will gradually release the salt.
  • The pantyhose method works much faster if you start by pouring water on the pantyhose. I didn't try this myself.
  • When salt alone is used, it will wash out within a week and the ice channel will freeze over again.

Pros: If you fling the stockings onto your roof from the ground, it's pretty safe.

Cons: This takes a long time. After a week of near-zero temps, the pantyhose looked just the same. They hadn't even made a dent. I don't think I would have the patience to do this if I had water leaking into my house. Also, this could lead to rusted-out gutters.

Verdict: Better than nothing.

Heat Cables

For the record, heat cables aren't supposed to be placed directly on ice dams, but some people might try it anyway. My friend did this at a house he owned in Saint Louis Park, so I took pictures. These photos all show the heat cables after about one day.

Pros: Gets the job done eventually, I suppose.

Cons: Heat cables aren't made for this, and I'm sure the manufacturer would tell you that this poses some type of safety hazard. Stringing up the cable was also very unsafe.

Verdict: Don't do this. Seriously.

High-Temperature Pressure Washer

A pressure washer will certainly remove ice dams, but it will create a ridiculous ice mess below, and will surely damage the shingles. This was one method that I didn't even test. The photo below shows what can happen to a roof after a pressure washer or high-temp pressure washer is used on a roof.

There is a big difference between a steamer and high-temperature pressure washer. I show a couple of examples in my video at the beginning of this post. Don't let anyone come near your roof with a high-temperature pressure washer.

Conclusion

Ice dams suck. If you have water coming through your ceiling in the dead of winter, it's not a problem with your roof, it's a building science issue. You either have an ice dam or you have frost in your attic. Follow the advice given here to fix your ice dams.

Author: Reuben Saltzman, Structure Tech Home Inspections