No need to wait for the ice cream truck's clarion call for icy cold treats. (Inevitably, it arrived at dinnertime or naptime as it cruised through my neighborhood, to the annoyance of many, including this mother.)
You can make the icy pops yourself and -- of course you know this because you are reading the food section -- make them even better with fresh fruit and good ingredients. Before you shout "treats that are good for you so let's eat a lot!" keep in mind that just how healthful these treats are depends on the combination of ingredients you use (it may be a stretch to convince anyone that an icy pop made of premium ice cream is healthful, even though it tastes terrific).
At the very least, though, you will know what's in the treat that you or a loved one is licking and, for some of us, that matters. With great ingredients and molds available in all sorts of shapes, you have options at home that the Good Humor driver can only dream of.
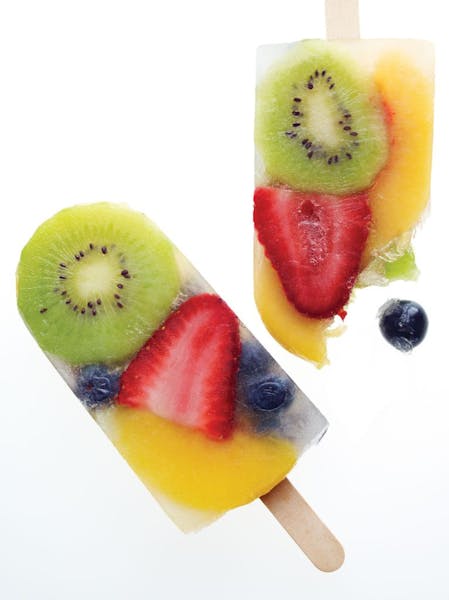
From a fresh fruit-salad version, pictured here, to a banana-malt delight or a Mexican-style paleta, choices for icy pops are limited only by what's in your refrigerator. Let the kids help with the process and you'll have a cooking lesson, too.
You can use almost anything for the mixture -- consider what you'd put in a smoothie and use that as a starting point. Bases for the icy pops can start with juices and puréed fruit, yogurt, ice cream or pudding. Then have some fun with the extras -- think pieces of fruit, toasted nuts or coconut, chocolate or other candy bits (we can't be healthful all the time!).
For such a simple culinary process, there are a few recommendations that streamline the effort and make for better results. But should there be a mishap -- oh, no! the icy pop is crooked; the colors don't go together -- the "mistakes" will all be tasty.
• Plastic molds for making ice pops come in a variety of shapes -- rockets, stars, the traditional Fudgsicle style-- with built-in sticks to hold, are available in kitchen specialty stores and craft stores, as well as amazon.com. You can also use small paper cups and insert wooden pop sticks from supermarkets or craft stores. Or use wooden or bamboo cocktail sticks for smaller pops. Try muffin tins and papers for a mold, or silicone ice-cube molds for mini-versions. For more formal gatherings of adults, when a large dessert-on-a-stick would be awkward, try making any of these treats in shot glasses or timbale molds. For either, you can use a wooden craft stick, or simply serve the treat unmolded.
• If your mold doesn't have a handle to attach, you'll need to either add a wooden stick once the mixture is partially frozen, or use foil with a small cut in it on top of the mold and push the wooden stick through it to hold it in place while the mixture freezes.
• It sounds obvious, but check for space in your freezer before you are done. And make sure the space is level so the pops don't freeze at odd angles.
• A standard pop mold holds 1/3 cup of mixture. Allow at least a 1/4 -inch space at the top, as the mixture will expand with the cold.
• Sugar and alcohol keep the mixture from freezing. As Charity Ferriera points out in her terrific "Perfect Pops," consider the difference between an ice cube and a can of OJ concentrate -- one is rock hard and the other is slushy. The more sugar the mixture has, the softer it will be when frozen. So a frozen pop made of only iced tea will be a hard rock, but add a puréed fruit and it will soften up. That's true when alcohol is added to the mix, too. Only a small amount of liquor will usually work (2 to 3 tablespoons for 4 to 6 pops, for example) or it will prevent the mixture from freezing at all. You may want to do some experimenting to find the right proportion for your needs.
• Blenders work best for a smooth pop; food processors will give some texture to the mix.
• Start with cold ingredients for the best outcome. The icy pops need at least 5 hours in the freezer to be firm. It helps to have your freezer at the highest setting.
• You can make stripes or swirls in your icy pops, and you can mix in ingredients. For stripes, you'll need to freeze layers individually, allowing about 30 minutes between them before adding another layer. (If they are too solid, the next layer won't adhere.) For swirls, Ferriera says, use two thick mixtures (such as pudding) or use a liquid and an ice cream (the liquid freezes around the ice cream, creating streaks). So that mix-ins don't sink to the bottom, use a thicker mixture as the base.
• To unmold, run warm water over the exterior (if using plastic).
• The pops will last about a week in the freezer in the molds; they can be kept longer if taken out of the mold once frozen and stored in individual plastic bags to prevent freezer burn.
I'm already stocking up on icy pop molds because, with a weeks-old granddaughter -- my first -- in the family, I expect to be making healthful treats in summers to come. Just call me the Good Humor Grandma.
Lee Svitak Dean • 612-673-1749